Showing posts with label vegetarian recipe. Show all posts

Saturday, June 27, 2015

Super Happy Donabe Steamed Vegetables


...for my American friends.

 photo IMG_0610_zpspjgtolss.jpg
I wanted to express with my donabe dish.

#lovewins
Happy donabe life!

Saturday, July 5, 2014

Donabe Recipes...Summer Vegetables Curry with Turmeric Rice


I'm on fire doing donabe cooking with all the summer vegetables.
And, of course, my appetite for tomato curry grows even bigger especially in the summer time. This dish can be made with very similar ingredients as making ratatouille. The big difference is the spice. Just like my ratatouille, vegetables can be sun-dried beforehand. But, in this recipe, I simply salted eggplant and zucchini to take some moisture out before cooking. Cherry tomatoes and kabocha are cooked separately in the oven. They can be directly added to donabe without pre-cooked, but these extra steps make the dish taste much nicer. Kabocha tastes sweeter and its texture is much better aftert it's roasted.

 photo IMG_3154_zps8f165545.jpg
Here's my summer vegetable curry recipe. The dish is completely vegan, and extremely satisfying. I use shio-koji to season the dish, so this brings up the umami flavors in this dish. My husband loves it so much he says he can finish the whole donabe-ful of it himself. My soup & stew donabe, "Miso-shiru Nabe", stays so busy during the summertime.

 photo IMG_3157_zps6ef8e32b.jpg
The curry is served with my donabe turmeric rice, which was made in double-lid donabe rice cooker, "Kamdo-san". This time, I used just water, instead of vegetable stock, and added some mochi-mugi (sweet barley) to brown rice. It was so nice with the curry.

 photo IMG_3169_zps39d04718.jpg
Vegetable curry and turmeric rice, both were made in donabe. It's so hard to stop eating.


Tomato-flavored Summer Vegetable Curry
(for large-size "Miso-shiru Nabe")

Ingredients (4 servings)

5 oz (150 g) cherry tomatoes, halved
1/6 medium kabocha squash, shave off thin layer of skin, and cut into large bite-size pieces
3 medium Japanese eggplants, cut into oblique
2 medium zucchini, cut into 1/2" (1 cm) thick disks
olive oil
1 medium onion, minced
1 clove garlic, grated
1 knob ginger, grated (about 1/2 tablespoon)
1 teaspoon cumin seeds
1 yellow bell pepper, cut into 3/4" (2 cm) square
2 to 3 teaspoons curry powder (make sure it's very high quality)
1 teaspoon cayenne pepper
2 bay leaves
8 oz (240 ml) crushed tomato from a jar/ can
1 cup (240 ml) vegetable stock (or chicken stock)
1/2 teaspoon garam masala
2 tablespoons shio-koji (can be substitued with 1 teaspoon sea salt)
salt and pepper to taste


Procedure
  1. Pre-heat the oven at 350F (180C) degrees. In a sheet pan, toss the halved cherry tomatoes in some olive oil, salt, and pepper. Spread in one layer. Roast in the oven for 25 minutes. Set aside.
  2. Turn up the oven to 450F (230C) degrees. In another sheet pan, toss the kabocha in some olive oil, salt, and pepper. Spread in one layer. Roast in the oven until it's just tender (15 - 20 minutes). Set aside.
  3. Put the eggplants and zucchini in colanders separately and sprinkle some salt and leave to let them sweat for 15 minutes. Rinse and pat dry.
  4. Heat 2 tablespoons olive oil in a pan and sauté the eggplants over medium to medium-high heat until golden brown. Transfer the eggplants to a plate lined with paper towel to drain excess grease. Set aside.
  5. Wipe off the grease from the pan and heat 1 tablespoon olive oil. Sauté the zucchini over medium-high heat until golden brown. Transfer the eggplants to a plate lined with paper towel to drain excess grease. Set aside.
  6. In "Miso-shiru Nabe", heat 1 tablespoon olive oil and sauté the onions for 20-25 minutes until the onions are lightly browned.
  7. Add the garlic, ginger, cumin seeds, and bell pepper. Sauté until the bell pepper is softer (2-3 minutes). Add the curry powder, and cayenne. Continue to sauté for a minute or so until the mixture becomes fragrant.
  8. Add the bay leaves, tomato sauce, and vegetable stock. Turn up the heat to medium-high. As soon as the mixture (curry) starts almost boiling, turn the heat down to medium-low. Simmer for 10 minutes. Add the garam masala and shio-koji, and ground some black pepper. Adjust the seasoning with some salt, if necessary.
  9. Add the rest of the vegetables, and stir. Bring back to simmer and turn off the heat. Serve with donabe turmeric rice or plain rice.
Happy donabe life.

Sunday, June 29, 2014

Donabe Shio-koji Ratatouille with Sun-dried Vegetables


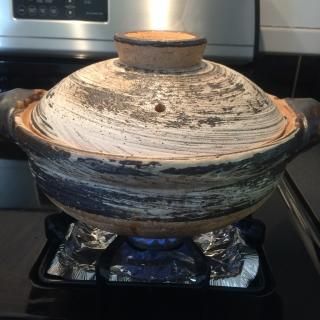
Here's another tomato-flavor dish with donabe!
My heart is so geared up for all the summer flavors. Ratatouille is one of the simple summer dishes I enjoy both making and eating so much. Jason loves my ratatouille so much that he says he can eat a whole donabe full of it himself.

 photo IMG_2999_zps7e87c996.jpg  photo IMG_3001_zps5cd75bf2.jpg
There are few points for the wonderful result in my donabe ratatouille. First, I sun-dry the vegetables for a few hours to half day. I'm not necessarily drying the vegetables, but I let them "sun-bathe" until they shrink a little and just the outside is dry when touched but inside is still moist. This process will make the dish less watery and flavors richer in umami. Also, the texture will be much better (less mushy), too. Also, instead of cooking everything in one pot, I pan-fry the eggplant and zucchini separately in a sauté pan until the surface is golden brown, before assembling with the other ingredients in donabe. This process helps preventing ingredients from collapsing, and makes the texture better, too.

 photo IMG_3002_zps23f6ff1a.jpg  photo IMG_3003_zps43d3b68c.jpg
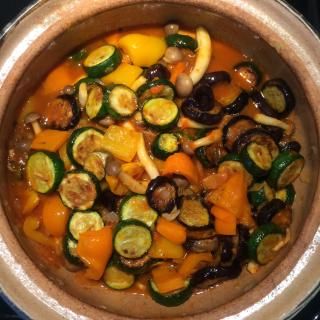
Once all the vegetables are in a donabe, add the crushed tomato, shio-koji (or salt is okay), and the remaining ingredients. Then, simmer for 15 minutes or so.

 photo IMG_3005_zps0ee21046.jpg
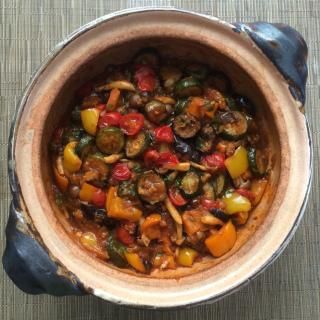
The delicious ratatouille is ready. Shio-koji seasons the dish with rich round flavor. It's an excellent donabe dish.


Shio-koji Ratatouille
(for medium-size classic-syle donabe)

Ingredients: 4 servings

4 medium zucchini, cut into 1/3" (8 mm) thick disks
6 medium Japanese eggplant, cut into 1/3" (8 mm) thick disks
1 yellow bell pepper, cut into bite-size pieces
1 orange bell pepper, cut into bite-size pieces
5 oz (150 g) shimeji mushrooms
6 oz (180 g) cherry tomatoes, cut in half
1 medium onion, minced
1/2 tablespoon fennel seeds
2 cloves garlic, thinly-sliced
1 1/2 cups (360 ml) crushed tomato (in a jar or can)
1 teaspoon oregano
2 tablespoons shio-koji or 1 teaspoon salt
2 tablespoons chopped fresh basil
olive oil
salt and pepper


Procedure:
  1. Place the cut zucchini, eggplant, bell peppers, and shimeji mushrooms in baskets, and let them sun-dry until they are slightly shrank and dry on the surface (a few hours to half day). Rinse and pat dry. Cut off the bottom of the shimeji mushrooms and pull apart by hand.
  2. Meanwhile, pre-heat the oven at 350F (180F) degrees. In a sheet pan, toss the cherry tomatoes with a small amount of olive oil and season with some salt and pepper. Roast in the oven for 25 minutes. Remove from the oven and set aside.
  3. In a sauté pan, heat 2 tablespoons olive oil and cook the zucchini until both sides are lightly browned over medium-high heat (about 1-2 minutes each side). Transfer to a bowl. In the same sauté pan, heat 3 -4 tablespoons olive oil and cook the eggplant the same way as zucchini. Add more olive oil, if necessary. Transfer the eggplant into the same bowl as the zucchini. Set aside.
  4. In a donabe, heat 2 tablespoons olive oil and sauté the onion and fennel seeds over moderate heat until the onion is very soft (about 10 minutes). Add the garlic and sauté for a couple more minutes. Add the bell peppers and shimeji mushrooms, and sauté until the bell peppers are soft (3-4 minutes).
  5. Add the crushed tomatoes, shio-koji, zucchini, and eggplant and set over medium-high heat. As soon as the sauce starts boiling, turn down the heat to simmer. Simmer for 10 minutes.
  6. Add a good pinch of black pepper. Adjust the seasoning with salt, if necessary. Add the cherry tomatoes and gently stir. Turn off the heat and let it rest for a few hours. For even better flavor, transfer the content to a different bowl and let it rest overnight in refrigerator.
  7. When it's ready to serve, Add the basil and stir gently. Drizzle more olive oil. Serve cold or at a room temperature.
You can also see the recipe in toiro kitchen's website.
Happy donabe life.

Thursday, January 16, 2014

Donabe steam-roasted vegetable with Saikyo miso aioli


In our neighborhood in Echo Park in LA, there is a cute grocery store called, Cookbook, which sells quality ingredients and deli items. I love walk by there to pick up organic vegetables from California farms and just cook simple way to enjoy their natural flavors.

I made simple lunch with vegetables from Cookbook.

 photo IMG_0708_zpsa027dea2.jpg
With purple kale, I made crispy kale. I simply tossed kale leaves in olive oil, salt, and pepper, and roasted in the 450F (230C) oven for 10 minutes. It's a quite addictive snack!

 photo IMG_0699_zps756e35c7.jpg
Beautiful red turnips, cauliflowers and kabocha were steam-roasted in my tagine-style donabe, "Fukkura-san". To make it, in the skillet of "Fukkura-san", I tossed the vegetables in olive oil, salt and pepper, and spread in a single layer. Added 1/4 cup (60 ml) water, cover with lid and cooked over medium heat until all the vegetables are cooked to tender (about 10-12 minutes. Right before turning off the heat, I added a few leaves of the turnips.

 photo IMG_0700_zps68926599.jpg  photo IMG_0702_zpsffdecdfd.jpg
The donabe was served at the table. It came out so nice. This donabe does the real wonderful steam-roasting job and makes the vegetables cook very nicely.

 photo IMG_0707_zpscc93eef3.jpg
These vegetables were served with my homemade Saikyo miso aioli. Here's my quick recipe:

Saikyo miso aioli

Put the following ingredients in Vitamix.
1/4 cup lemon juice
1/4 cup Saikyo miso (or sweet white miso)
1/2 shallot
1 small clove garlic
1 small knob ginger
1/2 tablespoon Dijon mustard
3/4 cup olive oil
a pinch of each salt and pepper

Blend until the mixture becomes thick paste.

Happy donabe life.

Friday, January 10, 2014

Donabe-simmered Arrowhead ("Kuwai")


I found arrowhead at a Japanaese market in LA Little Tokyo recently. It's very hard to find in LA, so I was nicely surprised.

 photo IMG_0750_zps5b44e892.jpg
We call it "Kuwai"(慈姑)in Japanese, and it's a popular ingredient in Japanese cooking. We eat the tuber of it, by peeling and cooking it. There are different ways of cooking the tuber, including simmering and deep-frying.

 photo IMG_0752_zpsbfc39c4b.jpg  photo IMG_0754_zps151fb6e4.jpg
I cut off the bottom stem and peeled the skin by a pairing knife. The tip of bud should be cut off by leaving about 1/2" (1.2 cm) long. I blanched them for a few minutes (to remove the bitterness), then cooked in a broth - 180 ml dashi stock, 1 tablespoon sake, 1/2 tablespoon sugar, 1 tablespoon miring, and 1 1/2 tablespoon light-color soy sauce ("usukuchi shoyu") in small classic-style donabe, "Hakeme" for about 15 minutes.

These cute tubers came out so tender and delicious. "Kuwai" is one of the traditional ingredients for Japanese New Year dishes ("osechi ryori") because it has the but shooting upward which symbolizes good luck. So, I'm glad I got to make myself a good luck dish this new year.

Happy donabe life.

Tuesday, January 7, 2014

New Year Good Luck Donabe Porridge - LA Style


January 7 is a day of "Nanakusa" in Japan. It means 7 herbs, and we eat "Nanakusa-gayu" (7-herb porridge) on the day to wish for good health.

Because it's almost impossible to find all the 7 herbs for "Nanakusa-gayu" in LA, I improvised and made my own version of herb porridge with "Nanohana" (rape blossoms), which is also difficult find in LA but I happened to find at a Japanese market.

 photo IMG_0792_zpsd96b58f2.jpg
My double-lid donabe rice cooker, "Kamado-san", makes wonderful porridge always.

 photo IMG_0781_zpscf7acf21.jpg  photo IMG_0791_zpsb2ab0078.jpg
I used partially-polished brown rice to make the porridge this time and it came out really nice.
I got another good luck today!

Rape Blossoms Porridge ("Nanohana-gayu")
  1. Boil 3 cups (720 ml) water in "Kamado-san". Add the rinsed 2/3 rice-cup (120 ml) rice and cook over high-heat for 3 minutes.
  2. Turn down the heat to medium and continue to cook for 12 minutes or until the rice is just tender. Meanwhile, stir from time to time.
  3. Add 5 oz (150 g) rape blossoms (cut into 2/3" or 1.5 cm length) and cover with lid. Turn off the heat and let it rest for 3-5 minutes.
  4. Serve into individual bowls with salt on the side.
*Rape blossoms can be substituted with broccoli rabe.
*For richer flavor, you can use dashi stock instead of water to cook the rice.

Happy donabe life.

Friday, January 3, 2014

New Year Donabe "Oshiruko" Brunch

Donabe-simmered "Oshiruko" with baked mochi

A HAPPY DONABE NEW YEAR!!!

 photo IMG_0540_zps457d78d0.jpg
The final lunch of 2013 was our traditional new year's eve soba noodles ("Toshikoshi Soba"). In our (Japanese) culture, we eat soba on new year's eve to pray for health and longevity. I made classic cold soba noodle on a bamboo tray ("zaru soba") with dipping sauce and condiments.

 photo IMG_0552_zps120e5954.jpg  photo IMG_0553_zpsbca77b4d.jpg  photo IMG_0615_zpse8b77556.jpg
On New Year's Day, Jason and I started with sweet azuki bean stew ("Oshiruko") brunch. First, I made azuki bean paste in my Soup & Stew Donabe, "Miso-shiru Nabe". I braise the beans in the oven for 1 hour, and this slow and gentle process makes the really flavorful and delicate bean paste. You can find my sweet azuki paste ("anko") recipe in toiro kitchen's website. I made the "anko" a day before, so it was ready to go on New Year's Day.

 photo IMG_0594_zps9d195711.jpg  photo IMG_0595_zps485e1d6c.jpg  photo IMG_0596_zpsbe745a02.jpg  photo IMG_0598_zps5b706fb1.jpg
About 1 cup of "Anko" was added to my mini-size classic-style donabe, "Rikyu-Tokusa" and diluted with some water (about 2: 1 ratio). While the mixture was being heated, I baked mochi in my tagine-sytle donabe, "Fukkura-san". I just set a grate on Fukkura-san's skillet (pre-heated over medium-high heat), laid mochi pieces, cover with lid and cooked until the mochi were puffed. So easy!

 photo IMG_0604_zpsbd0dbd1f.jpg  photo IMG_0605_zps06e66474.jpg  photo IMG_0610_zps8788bcae.jpg
Finally, mochi were added to heated azuki stew and served at the table. Our New Year Oshiruko was so delicious and I felt a lot of good luck coming!

Happy Donabe 2014!

Monday, December 30, 2013

Homemade Konnyaku

Homemade konnyaku, served sashimi style with vinegar-seasoned Saikyo miso

Konnyaku is one of the staple foods in Japanese culture. It's a jelly-like food, made from konnyaku yam root (also called devil's tongue). There are so many different varieties of shapes and types of konnyaku sold in Japan. It's rich in dietary fiber and extremely low in calories (almost none), so konnyaku is also a very popular health food in our culture.

When konnyaku is extremely fresh, we enjoy it sashimi style without cooking it. I brought back ingredients for homemade konnyaku from Japan, so I made my own konnyaku to serve as sashimi! For homemade konnyaku, you can normally find already powdered dry konnyaku yam root, so that's what I got. The ingredients are only the konnyaku yam root (powdered), water, and calcium hydroxide as a coagulator.

 photo IMG_0083_zpsb913789c.jpg  photo IMG_0085_zps832b9886.jpg
In a pot, you combine 850 ml water and 25 g powdered konnyaku yam root. Set over high heat, then as soon as the mixture starts bubbling, turn down to medium. Continue to stir for 7-8 minutes. The mixture will thicken like glue.

 photo IMG_0086_zpsef44cc11.jpg  photo IMG_0087_zpse853950f.jpg
Remove the mixture from heat and let it cool down to 42C - 43C degrees. Add 1.5 g calcium hydroxide and mix by hand until the mixture forms into one piece. Transfer to a mold and push the surface to make it smooth and let the air out from inside. Let it set for a couple of minutes.

 photo IMG_0090_zpse6806dfc.jpg  photo IMG_0091_zps439462ee.jpg
Remove the mixture from the mold and put in water in a pot. Set over high heat. As soon as the water starts boiling, reduce to simmer and let it cook for 20 minutes. Transfer to a bowl, filled with cold water. Let it soak in the water for more than 1 hour to remove bitterness.

 photo IMG_0092_zpsc85c32ed.jpg  photo IMG_0101_zps1d269638.jpg
The homemade konnyaku was ready and so bouncy! As soon as I was ready, I cut a few slices for myself to try. Both the flavor and texture were superb and heavenly. Homemade konnyaku is the best!

 photo IMG_0350_zps597f09e4.jpg  photo IMG_0354_zpsa8cf7b0a.jpg
The other day, I made a different variation of konnyaku. I made "ao-nori" (aromatic seaweed flakes) konnyaku. It came out wonderful!

I gotta get more konnyaku ingredients next time I return to Japan. Until then, I will suffer real konnyaku withdrawals.

Wednesday, October 9, 2013

Umami-packed "Moshio" Preserved Lemon...Finally Ready

"Moshio" Preserved Lemon, after 1 month

I've been a fan of umami-rich "moshio" sea salt for quite some time.

 photo IMG_2018_zpsa59f058f.jpg
This "moshio" sea salt is made in an ancient method in a small island in Hiroshima.

 photo IMG_2026_zps0b1477a4.jpg
I found a recipe of making preserved lemon by using "moshio", so I tweaked it a little and made my own preserved lemon. In a sterilized jar, combine 1 lb (450 g) lemon (each is cut into 8 pieces) and 2.5 oz (70 g) salt and mix well. (Salt is about 15% of the lemon by weight.) Add a bay leaf and a seeded dry red chili. Cover and leave at a room temperature for 4 weeks. Meanwhile, shake the jar upside down every few days for even distribution of the salt.

 photo IMG_2412_zpsc0115a8e.jpg
After exactly a month, my "moshio" preserved lemon was so nicely ready.

 photo IMG_2410_zps3e0777c9.jpg  photo IMG_2403_zpsd44f987f.jpg
To begin with, I made simple vinaigrette with my "moshio" preserved lemon. I whisked together 1 piece of preserved lemon (minced) with 1/2 tsp juice, 2 tablespoons Kyoto-style "Awase-zu", and 2 tablespoons olive oil (I love Pasolivo!). Add some ground black pepper. I made a salad with some kale, grilled zucchini, grilled corn, radish, roasted almond, and feta cheese, and tossed in this vinaigrette. It came out so flavorful and gorgeous.

 photo IMG_1676_zps2e26d6be.jpg  photo IMG_1678_zps122027df.jpg
And, of course, I really wanted to make Chicken Tagine! So, I marinated bone-in chicken thighs with minced preserved lemon flesh, minced onion, grated ginger, garlic, and some spices (turmeric, saffron, ras el hanout, etc.) for overnight.

 photo IMG_1680_zpsa98cd787.jpg  photo IMG_1682_zps4f37f549.jpg  photo IMG_1683_zps07d6484c.jpg
In my tagine-style donabe, "Fukkura-san", I cooked the marinated chicken and fennel bulb.

 photo IMG_1685_zps646bba0b.jpg  photo IMG_2426_zps4ef87302.jpg  photo IMG_2428_zpsbe87073f.jpg
After 1 hour over low heat, my donabe tagine chicken came out so delicious! With the "moshio" preserved lemon, chicken was so rich and aromatic. Because the tagine-style donabe has a nice shallow body, the ingredients cooked perfectly in one layer. This time, I kind of played around with spices and other ingredients as I cooked so I didn't really write down the recipe. But, next time, when I will, I want to post the recipe in my blog.

Happy donabe life.